


There are 5 different patterns,
so you can choose the one you want and make it.
Pictures and Description

I made a single card wallet that is easy to make.

Prong snaps card wallets.

Plastic snaps card wallets.

Fastener snaps card wallets.

It is small but can hold about 10 cards.

10cm x 7cm (4" x 2¾")
Materials

Outer, Lining : Linen, Non-woven fusible interfacing (2 oz),
The pattern is on my YouTube channel.

There are 5 patterns, so cut the interfacing in the shape you want.

Prong snap button (9mm), Pliers, Label, Needle, Thread, Iron

You can also sew these snaps by hand.
How to make

1. Draw lines at intervals of 7 cm and 6 cm.
2. Attach the interfacing to the outer and lining.

3. Fold the lining and sew it.
4. Fold the second drawn line outward.

5. Install one snap.

6. Place the label where you want it.
7. Lay the outer fabric on top of it and sew it leaving an opening.
(Since the seam allowance is thick for the folded part of the lining, sew it slightly outward by about 1 to 2 mm.)

8. Cut notches along the curve and clip seam allowances.
9. Turn inside out.
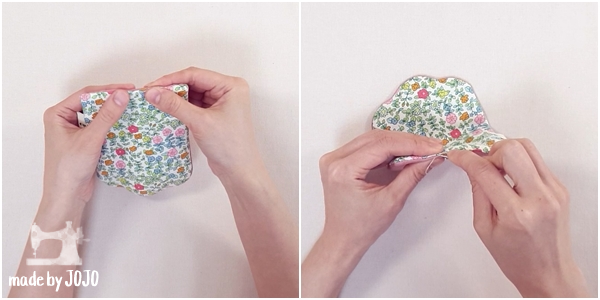
10. Sew the opening by hand.

11. Install the rest of the snaps.
Youtube
00:45 Materials
00:55 Drawing a line on the wrong side of the lining
01:15 Attaching the fusible interfacing
02:11 Folding lining
02:25 Installing the first prong snap button
03:45 Sewing with label and outer
04:45 Trimming seam allowances
05:24 Turn out
05:50 Hand-sew the opening
06:27 Installing the second prong snap button